Learn about the step-by-step process of roof installation and the key components of a roofing system.
Understanding the Importance of a Quality Roof
A quality roof is essential for the protection and safety of your home. It serves as the first line of defense against the elements, such as rain, snow, and wind. A well-installed and maintained roof can prevent water leaks, structural damage, and costly repairs. Additionally, a quality roof enhances the curb appeal and value of your property. Investing in a durable and reliable roofing system is a wise decision that can provide peace of mind and long-term benefits.
To ensure the importance of a quality roof, it is necessary to understand the key components of a roofing system.
Key Components of a Roofing System
A roofing system consists of various components that work together to provide protection and durability. These components include:
- Roofing materials: The type of roofing material used, such as asphalt shingles, metal, clay tiles, or slate, plays a crucial role in the performance and lifespan of the roof.
- Underlayment: The underlayment is a water-resistant barrier that is installed beneath the roofing materials. It provides an additional layer of protection against water infiltration.
- Flashing: Flashing is used to prevent water from seeping into vulnerable areas, such as roof valleys, chimneys, and skylights. It is typically made of metal and is installed around these areas to create a watertight seal.
- Ventilation: Proper ventilation is essential for a healthy roof. It helps to regulate temperature, remove excess moisture, and prevent the buildup of mold and mildew.
- Gutters and Downspouts: Gutters and downspouts are responsible for directing water away from the roof and foundation of the house. They help to prevent water damage and maintain the integrity of the roofing system.
Understanding these key components will enable you to make informed decisions about your roof installation process.
Preparation and Planning
Before starting the roof installation process, thorough preparation and planning are necessary. This includes:
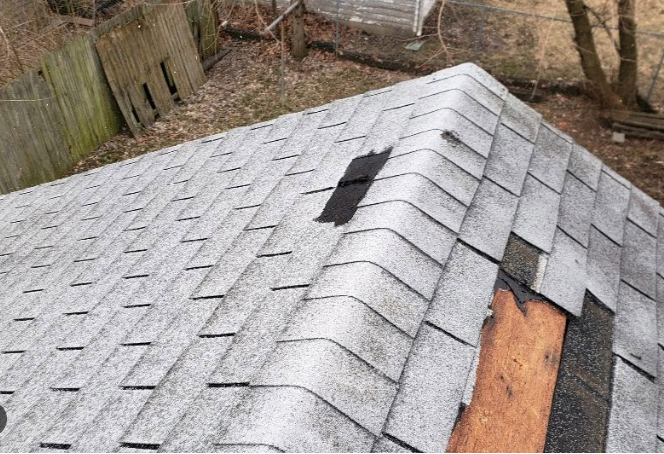
- Roof inspection: A professional inspection will determine the condition of your existing roof and identify any repairs or replacements needed.
- Measurements and calculations: Accurate measurements and calculations are crucial for ordering the right amount of materials and ensuring a proper fit.
- Permits and regulations: It is important to check local building codes and obtain any necessary permits before starting the installation.
- Safety precautions: Roof installation can be dangerous, so it is essential to follow safety guidelines and use proper equipment to protect yourself and others.
Taking the time to prepare and plan will help ensure a smooth and successful roof installation process.
Installation Process
The roof installation process involves several steps, including:
1. Removing the old roof: If necessary, the existing roofing materials are removed to create a clean surface for the new roof.
2. Repairing the roof deck: Any damaged or rotten sections of the roof deck are repaired or replaced to provide a solid foundation.
3. Installing underlayment: The underlayment is laid down, starting from the bottom of the roof and overlapping each row to create a water-resistant barrier.
4. Applying roofing materials: The chosen roofing materials, such as asphalt shingles or metal panels, are installed according to the manufacturer's instructions.
5. Flashing installation: Flashing is applied around roof valleys, chimneys, and other vulnerable areas to ensure a watertight seal.
6. Ventilation installation: Proper ventilation components, such as ridge vents or soffit vents, are installed to promote airflow and prevent moisture buildup.
7. Gutters and downspouts: Finally, gutters and downspouts are installed to direct water away from the roof and foundation.
Each step of the installation process requires precision and attention to detail to ensure a durable and long-lasting roof.
Final Touches and Inspection
After the roof installation is complete, final touches and inspections are necessary to ensure quality and functionality.
1. Clean-up: The job site is thoroughly cleaned up, removing any debris or leftover materials.
2. Inspection: A professional inspection is conducted to check for proper installation, adherence to building codes, and overall quality of the roof.
3. Final touches: Any necessary finishing touches, such as caulking or painting, are done to complete the installation and enhance the aesthetic appeal.
By completing these final touches and inspections, you can have confidence in the performance and longevity of your new roof.